It wasn’t just for him

I attempted a sexy photo for my husband which fell flat no matter which angle I tried. When I realized how flat it fell, I started researching all around for a boudoir photographer and found one whose work I kept coming back to in all my searches, Envy U Photography.  I liked the style of the photographer, I mean, there were a few poses that weren’t for me, but overall, the final products in her portfolio had me excited enough to contact her.

Little did I know that I would be getting more than beautiful sexy photos for my husband.

When I walked in for my appointment, I was greeted by Charlotte, the photographer, and her hair and make up artist, Justina Ford. I filled out some paperwork while they asked me some questions, then Justina got to work on my head. I had brought my own outfits with me and Charlotte added some things to go along with what I already had to create the look she envisioned for me.

I’m pretty comfortable with myself and my body so the two of them seeing me in lingerie didn’t bother me at all, my biggest worry was how my face would put off sexy through a camera lens. Once Charlotte started giving me direction, I had every confidence she knew what she was doing. I honestly didn’t have to do a dang thing except follow her direction. She even showed me my images on her camera throughout the session. The more I saw, the more confident I got. By the time I walked out of there five hours later, I felt like a rock star.

I walked on that high for THREE weeks. It put a skip in step that had gone missing since I joined the motherhood club. I wanted to drive fast with the top down in a convertible listening to Kings Of Leon’s Sex On Fire as loud as I could get away with.

I hadn’t even told my husband yet what I was up to. A week later, I went to see the final images and select the ones I wanted to keep. BOOM! Another confidence builder!
Charlotte had taken such care putting my body into the most flattering positions so each and every one of my photographs were absolutely stunning. Some were even exquisite. She saw that, she knew what she was doing, she KNEW what she was doing to me. She gave me back something I didn’t know I had lost years ago. What a gift!

While I didn’t know I was going there for more than photographs, Charlotte did. Her work = nothing short of incredible.

As for my husband, he said the photographs made him realize what he had forgotten, that I am more than a mom with two young kids, that I’m a sexy young woman, his wife.

20140623-094322.jpg

Christmas Ornament Characters

Since becoming a SAHM, I’ve had to learn to budget better than I once did.  This means Christmas gifts for family members requires imagination and creativity.  I’ve come to the conclusion, I am not very creative but I also know a great not-so-well-kept secret called Pinterest.  People out there are so darn creative, it makes me sick and happy at the same time.

I settled on making Christmas ornaments and went to town on Pinterest looking for some ideas on how to make them.  I came across some glass ornament characters that I thought were really cute and simple enough, so I dove in further and clicked on the website.  Imagine my disappointment when I found just an image of the homemade ornament and not a step by step tutorial.  Sad face.  I wondered if I was creative enough to figure it out myself and decided I needed my box of goodies to get me started. 

Here’s what I found what I needed to create the characters, Frosty, Rudolph, Elf, and Santa:

Santa, Frosty, The Elf, and Rudolph made GREAT gifts for teachers, family members and friends

Santa, Frosty, The Elf, and Rudolph made GREAT gifts for teachers, family members and friends

glass ornaments
glitter
posterboard
pipe cleaner
clear Elmer’s glue
hot glue gun
paint brush
a kid free environment
wiggly eyes

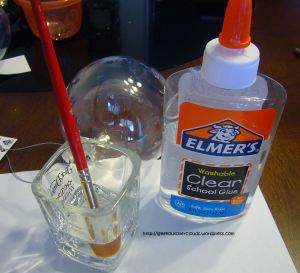
First I took out the stem of the glass ornaments.  Next I had my handy dandy husband put together a mixture of clear Elmer’s glue and water.  The mixture needed to be liquid enough to coat the inside of the glass ornament but thick enough to stick to it and not run off completely. 

The goo

After the mixture was just right in consistency, I poured alittle into the clean glass ornament.

Coat the entire inside of the glass ornament by swirling it around.  An even coat is best for this type of project.

Coat the entire inside of the glass ornament by swirling it around. An even coat is best for this type of project.

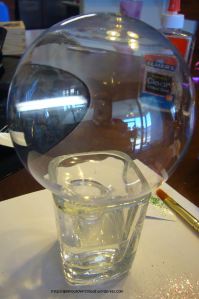
Once I had an even coat, I laid the ornament upside down over the glue container to let any excess glue drip out.  This is very important because otherwise you end up with runny glitter clumps once you add glitter to the ornament.

Let ALL the excess glue drain out before continuing on to the next step.

Let ALL the excess glue drain out before continuing on to the next step.

Meanwhile, while you are waiting for the excess glue to drip out, you can gather your ornament decorations that you will be gluing to the outside of the ornament to create the character.  Using scissors or better yet, your Silouette (which I do not have), cut out the buckle to the belt for the elf and Santa, the belts and the little booties for the elf. 

Using your glue mixture you can  paint some glue onto the buckle cut out and sprinkle glitter over the top to add some sparkle and pizazz to their outfits.

paint with glue, then add glitter.  Let dry!

paint with glue, then add glitter. Let dry!

I also used a hole punch and foam stickers to make buttons and Frosty’s mouth.

Foam sticker sheets and a hole punch.

Foam sticker sheets and a hole punch.

Once all the excess glue has dripped out, pour about a tablespoon of glitter into the glass ornament.  I used, though I do not have a photo to show it, a paper cone that I taped together to funnel the glitter into the ornament “neatly”.

pour glitter into the glass ornament using a homemade paper cone or the container it came in.

pour glitter into the glass ornament using a homemade paper cone or the container it came in.

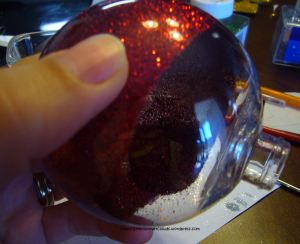
Completely coat the inside of the ornament with glitter

Evenly coat the inside with glitter,

Evenly coat the inside with glitter,

Once you have an even coat of glitter, tip the open end of the ornament over a cup or dish to drain out excess glitter.

excess glitter be gone

Next, it’s time to decorate and make them your own!  I used SMALL amounts of hot glue to add the eyes, nose, buttons, belts, stockings and mouths to the ornaments.  If you don’t have a hot glue gun, no worries, use regular glue.  I also had foam stickers on hand, that I used to add small items to the ornaments so you could always go that route. 

I used three dots of hot glue to add the belts to the glass ornaments.  I was too afraid of cracking the glass to use any more than that.

I used three dots of hot glue to add the belts to the glass ornaments. I was too afraid of cracking the glass to use any more than that.

hot glue them babies!

I realize this ornament is green.  I hadn’t planned on blogging about my ornaments until too late so I had to start taking pictures mid-ornament and then start a new one to get you the instructions on the glitter since there weren’t any out there in Pinterest world.  One blog suggested using Mop-Glo as the tacky substance on the inside of the ornament.  If it works for you, let me know!

So are you ready to see some up close finished products?  Here ya go!

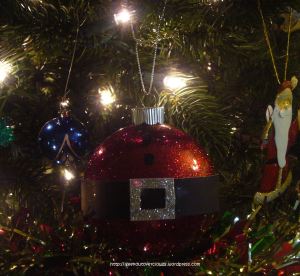
Santa Baby

Santa Baby

One of my favorite ornaments but a pain in the butt without a Silouette machine.

One of my favorite ornaments but a pain in the butt without a Silouette machine.

Frosty, The Snowman! (no button nose, sorry)

Frosty, The Snowman! (no button nose, sorry)

The Red Nose Reindeer

The Red Nose Reindeer

I was so excited when I finished these adorable ornaments.  I can’t believe I made these all by myself!  This year, now that I know what I’m doing, I may let the kids “help” me with these.

Cheater Chicken Soup: Good For What Ails You

The dreaded cold has sneezed it’s way into my house.  First, my youngest got it, now me.  I am M-I-S-E-R-A-B-L-E!  Couldn’t be that my body is on some hormonal roller coaster that I can’t quite latch the seatbelt on or that my youngest refuses to sleep at night….er, I mean AT ALL!  But you aren’t here to hear about my life today, you are here to make some chicken soup.  It’s mmm mmmm good.

Ingredients:

3 stalks of celery, chopped
1 large sweet onion, chopped fine3 large carrots, cut into slices

1 48oz containers of low sodium Swanson Chicken Broth
1 48 oz containers of regular Swanson Chicken Broth

1 pre-cooked rotisserie chicken from your local grocery store
4 tsp of thyme
1 Tbsp basil
2 whole bay leaves
Salt and pepper to taste

Instructions:

1. In a pan or if your large crockpot can handle a sauté setting; sauté onions and celery on medium until they just start to brown.

2. If using a pan, dump the vegetables into a crockpot with the broth.

3. Add the whole chicken (Keep the string on it if you can.  It makes it easier to pull out of the broth when the time comes.)

4. Don’t throw out the juices in the bottom of the rotisserie chicken container.Dump that juice into the broth too!

5.  Add spices, carrots and anything else you want to flavor up your broth.

6. Stir around the chicken as best as you can.

7. Set crock pot to high for 2 hours.  (Stir occasionally if you’re nosy like me but it is not necessary.)

8. After two hours, pull the whole chicken out.  It should want to fall apart, that is why keeping the string on the chicken is a good idea.

9. On a cutting board, pick the meat off the chicken.  CAUTION:  IT WILL BE HOT so use a fork and tongs.

10. Using a fork, shred the chicken into smaller pieces then add it to the broth.

11.  Stir together and VOILA!  You have yourself some Cheater Chicken Soup!

12.  If you want noodles in your soup, I highly encourage to keep them separate from the soup because after they siat together for awhile, the noodles get super mushy.


If you know of a way to prevent that over the course of a few days in the fridge, let me know!

13.  I love me some fresh bread to dip into my soup!

NOTE:  Since the chicken is already cooked, you don’t HAVE to cook on HIGH for 2 hours, it just helps to meld the flavors together.  Leftovers the next day are far better than the first day, am I right?

Last Minute Baby Shower

A baby shower dropped kersplat right into my lap.  One week to get something put together for a new mommy.  And I’m a sucker for a new mommy.  It’ll be her first baby shower and unfortunately, her husband is deployed and won’t be able to partake in it.  Double sucker.  There’s nothing like a mommy-to-be to bring out my nurturing, protective, let me give you everything that I have to help you get through this mode.

So there I was, scouring the internet for ideas on what to do.  It’s supposed to be a low-key shower and the venue is in a very popular, cluttered restaurant.  The first thing I came across was this easy diaper cake tutorial from Slap Dash Mom.

This was just the first thing I came across.  It’s going to be perfect for her!  Next, I need to work on games that I can do in this popular restaurant.  I’m thinking String-Around-The-Mommy, The Don’t Say “Baby” and the Dirty Diaper games  Any other suggestions?  What about prizes for a co-ed baby shower?

Update:  Here is my version of this awesomely easy diaper cake.

Milk Jug Pumpkins

I saw this craft on pinterest and decided it would a great CHEAP Halloween decoration that I can make with the kids. I also included pictures on how to do it rather than just the final  product.

My kids are not the best artists which totally goes against my need for perfection in crafts.  I hate myself for always wanting to straighten out a line here or there, or make sure the right colored crayon colors the right object. Trust me, it takes every ounce of restraint for me not to do my daughter’s Pre-K homework for her.  My hands just itch to intervene her “artwork”.  I’ll admit though, she’s getting better at staying in the lines, which is why I let her do up a milk jug pumpkin of her own.  Sadly, my OCD got the best of me when she had lost interest and I “finished” it up in order for it to be on display at our house.  😦  I know, I know.  Bad Mommy.

Items that you will need for this craft:
gallon milk jugs.  (Empty and clean.  Your choice as to the quantity.  I started collecting them at the end of August to get 10 jugs)
Permanent black marker
Knife
Duct or Packing Tape
String of Christmas lights (your choice in color.  I chose orange to make them look more Halloweenish but I’m sure colored or white look just as nice)

Step 1:
Be sure to have your milk jugs cleaned out prior to saving them so when you finally go to start this project, you’re not knocked unconscious by the fumes of the spoiled milk dregs at the bottom of the milk jugs that you’ve been saving for months.  (I THOUGHT I had been cleaning them out all along)

Step 2:
Peel off the stickers.  I figured this was something easy for my kids to do but I totally lost them after 4 minutes and 18 seconds.  Oh well.

Step 3: 
Using the black permanent marker, draw your pumpkin faces.

Step 4:
Take off the safety ring under the cap.

Step 5:
Color the whole cap with your black marker

Step 6:
Cut a 1-2″ hole in the back of the jug near the bottom

Step 7:
Tape the milk jugs together

Step 8:
Insert lights into the holes on the back of the jug, evenly distributing them through all the jugs.

Step 9: 
Place the line of jugs upside down and tape them together on the under side to keep them together better.

Step 10:
Light em up!

The one thing I’m not quite sure about is storing these for next year.  They seem kind cumbersome.  Got any ideas?

Mud’s Mudslides


Ingredients:

1 1/2 cup uncrushed ice
1 – sliced up Banana
1- shot of Kahlua
1- shot of Baileys
1 – shot of Grey Goose Vodka
2 – shots of milk
2 – shots of Vanilla Creamer
Hershey’s Plain Chocolate bar (quantity depends on preference)

Combine ice and banana in a blender. 
Then add all liquids. 
Blend until texture is smooth. 
Pour into glass. 
Shave chocolate on top. 
Enjoy.
Repeat process until you’re happy and you know it.

Tongue Tied Grilled Cheese


Ingredients:

Habanero Jack Cheese
2 slices of bread
1/2 Avocado
Butter, margarine or Olive Oil Mayonaisse
Favorite seasoning

Optional:  2 slices of bacon

1. Butter up one side of each slice of bread.  I enjoy a thick piece of bakery fresh bread from the local grocery store for my grilled cheese sandwiches.

2. Slice up your cheese to be as thin or as thick as you want it.

3. Lay your cheese on the unbuttered side of your bread.

4. Slice your avocado and lay it on top of the cheese.  (if including bacon, add it here)

5. Sprinkle with your favorite seasoning.  Mine is Tastefully Simple’s Seasoned Salt.  Do not over do it!

6. Place your loaded slice of bread on the griddle or frying pan

7. Lay the other slice of bread on top with the butter side facing out.

8. Brown both sides of your grilled cheese sandwich to desired color but be sure to melt your cheese in the process.

9. Remove from heat and enjoy.

A Lie For A Lie

I don’t know where a four year old picks up lying but it has gotten to the point just before getting out of control in our house.  I hate asking, “What did you do to make your brother cry?” and getting an evasive, “Nothing.”

On our way home from the beach the other day, when the neighbor’s kid started screaming in the back row and I asked my usual question to only get the usual response, I had had enough.  I said, “Buggy, you’re lying to me.  Your nose is growing.”

Since she has seen Pinocchio only a handful of times, I wasn’t sure if she would get it or if it would make the impact I was hoping for, but oh did it work on my vain daughter.
Like.A.Charm
Not only did she quit antagonizing her friend, her hands went up to her nose to check it’s transformation.  Thank goodness there wasn’t a mirror around for her to call me out.
“Oh no, Mommy!  We have to get it back down!”
I stifle my giggle, “Oh, I’m sure it will once you start behaving like a good girl.”
Wouldn’t you know, her nose was back to its rightful size by the time we got home.
Tonight I decided to try it again when she took a precious toy away from her brother.
“Buggy, what did you do to your brother?”
“Nothing,” she says with her hands behind her back.
“Really, Buggy?  Because I can tell by the way your nose is growing again, that you’re lying to me.”
Her hands come around from behind her back and she places the toy train back into my sniffling little boy’s lap.
“Mommy, is my nose still growing?” she asks.
“No baby, it stopped but you’re going to have to do some good deeds for it to go back to its normal size.”  I say, “How about you go brush your teeth?”
Off she went to the bathroom.  After I inspected her teeth she asked, “Has my nose gone back down?”
I debate whether or not to press my luck but I figured, so far so good.
“No,” I say.  “But I think if you clean up all your toys in your room, that should do the trick.”
10 minutes later her room was spotless of toys and her nose was just as beautiful as the day she was born.
Lying to my very gullible child to teach her not to lie is not lost on me.  I feel like a hypocrite when I do it.  However, given that most efforts to get my children to do as I say fall short of achieving my goals, I will milk this gem of a disciplinary tactic for as long as I possibly can.
In the same breath, I get a good laugh out of it too, as did my husband tonight when he saw first hand how easily I could manipulate our daughter into getting things done that typically require me to yell, scream and lose my temper.
I say, Mommy, 2; Buggy, 0

Keep your cooties to yourself!

Mommies don’t get sick.  Ever!  Right?!

Wrong.  There comes a time when even we catch the cooties are children so willingly share with us.

Case in point.  My son had a virus recently which the doctor called 5th disease.  I bought the crazy the elderly doctor was selling for a few days but then I started to think he was wrong.  Say it isn’t so!

If you know anything about 5th disease, it’s trademark is a lacey rash, of which my son never got.  I think he just had some virus and it just sucked for 10 days.

We were laying low the entire time.  When I figured he was in the clear, I took the kids out for some fresh air and some socializing.  Everything was going great.  As we got into the car to leave, I felt it.

Sniffle.

OH NO!

Fortunately, I had my tissue box ready and I had the inside scoop as to what to expect.  What I didn’t like was having to confine ourselves back to the house.  I kept saying I wouldn’t wish this on my worst enemy so I’m sorry to the people I came into contact with.  I didn’t know I had picked up my son’s adorable cooties.

We waited it out for 4 days, mostly with movies and naps.  (Quiet time, if you’re my daughter.)

Then one day, the pain in my face was excruciating.  That night, it was my ear.  Pain like I’ve never experienced.  (Keep in mind, I gave birth to my kids naturally without pain killers or thick needles in my spine.  So for me to say I’ve never experienced such pain is saying something.)

I started researching medicines in my cabinet to see what I could take together to knock the pain out of my head.  Robitussin with codeine.  Check.  Motrin.  Check.  Heated rice sock.  Check.  After about 3 hours of trying to get to sleep, I finally did with the sock over my ear.  For 10 minutes.

And then the pain was gone, to be replaced with a crinkling plastic noise, water rushing, popping, snapping, fizzing, foaming and the ocean.  All this with a cotton ball in my ear.

It was 2 am, I was freaked out!  There I was in bed, hunched over my iPad, punching out emails to my husband giving him a play by play.

We concluded that I had ruptured my ear drum.

And then the whimpering march of my children started and I didn’t have the energy to fight them.  I just surrendered my queen size bed to their will and I grabbed my medicine station (tissue box, cotton balls, garbage can, ear thermometer, water bottle and telephone) and lap top and headed to my son’s bedroom.

After a few uneasy phone calls, some restless tossing and turning, I had a babysitter and an on call doctor’s referral to the local non-emergency office.

Babysitter came over before the kids were up and I was out the door.

As I conclude this post, I don’t know what you know about ruptured ear drums, but they hurt like a knife being stabbed in your head consistently.  Once it ruptures, the stabbing subsides to be replaced by nausea.

I’ve spent the last 4 days popping antibiotics, painkillers and anti-nausea medication.  I’ve also been laying on the couch so feeding my kids has been a challenge to say the least.  And you can forget about cleaning the house.  I’m lucky to get the dishwasher run and unloaded.  Today was the first day I haven’t been plagued with nausea and I have been able to get the kids out of the house for some necessary play time at the park.  Driving is scary because all I hear is ringing in my one ear.  I’ll try to stay away from heavy traffic hours.

But in case you were wondering, mommies do get sick and it sucks when we do because everyone in the house suffers.